Have you ever hesitated before painting over stained wood, unsure of the proper procedure?
As with other woodworking-related endeavors, like staining plywood, painting stained wood calls for a few key steps, done in the right sequence.
In this guide, I’ll use my 20 years of experience in staining and painting wood for construction projects as a building block to teach you the 7 essential steps to painting stained wood.
Let’s jump in!
Required Tools and Materials
Before we can even get to step 1, there are a few things you’ll need to get started painting over stained wood:
- Sandpaper (used for preparing the surface for priming)
- A primer to seal the wood before painting
- Foam roller brush – and it’s always good to have a back-up brush on hand!
- Tack cloth for wiping the surface
- A tarp to keep the work area clean
- High-quality paint
- A protective finish to add after you’re done painting
Steps to Painting Over Stained Wood
Now that we’ve gathered our materials, let’s walk through the 7 steps for painting over stained wood:
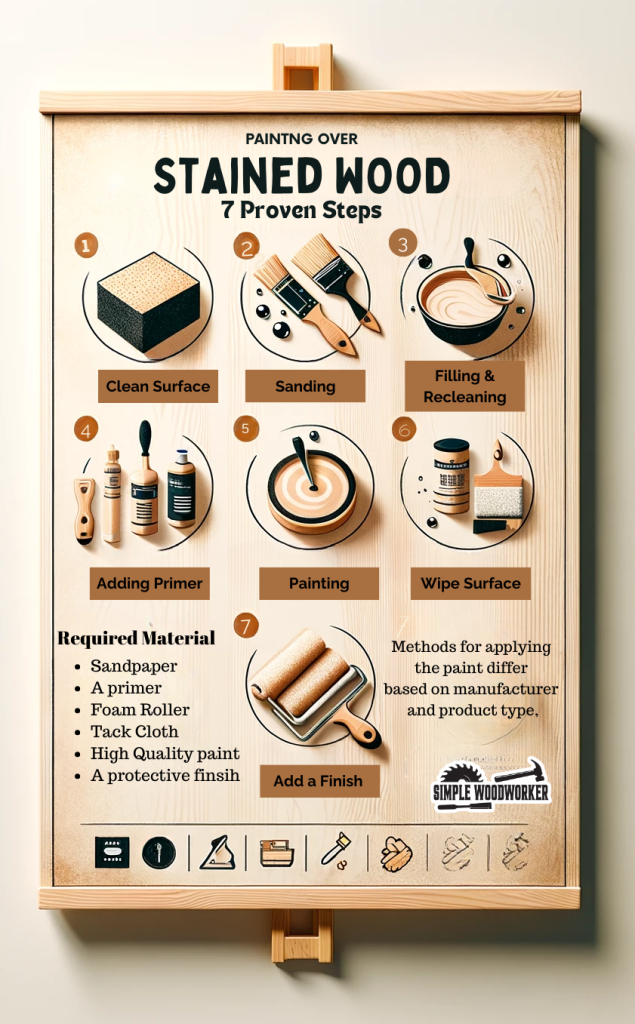
Step #1: Clean the Surface
Prior to the more fun work, we simply can’t overlook wiping down your surface!
Cleaning the wood is necessary to prevent contamination of the surface, which can cause the paint to stick.
The specific cleaning process will vary based on the type of surface you’re working with. Most surfaces will, however, give you the best results if you use a mixture of water and rubbing alcohol as your cleaner.
Once you’ve finished cleaning, let the surface totally dry before moving on to sanding.
Step #2: Sanding

Next, it’s time to bring out the sandpaper.
So, why do we sand the wood?
Simple: The sandpaper roughens up the surface, which gives the paint something to grip once you start rolling it onto the wood.
This goal is best achieved with conventional sandpaper. That said, you can also use a liquid sandpaper product, as it has the benefit of keeping your work area free of pesky dust particles after you’re done.
Let me emphasize that there’s no need to go overboard here: You’re just trying to make the wood grippy, not completely scrape off the surface!
Step #3: Filling and Recleaning
If your wood surface is relatively worn, there’s likely going to be some minor imperfections you’d like to smooth out before painting.
That’s where a filler comes in:
You can use a wood filler to quickly repair small cracks and holes in the lumber. I’d recommend looking into Plastic Wood’s Gold Oak filler, on account of its easy application, solid color, and simple cleanup process.
After you’ve applied the filler, you’ll unfortunately need to sand the wood again, but this time it should go more quickly.
Finally, clean up any dust or residue from your workspace, and step 3 is out of the way!
Step #4: Add a Primer
Now for a critical step: Applying a primer coat.
I’ve learned throughout my woodworking career that there are three main advantages to using a primer:
- Surface protection. Primers seal the wood surface from contaminants during painting, keeping the wood clean and healthy. Which is good news for longevity!
- A stronger paint bond. The use of a primer helps bond the stain to the paint, making the paint layer maintain its quality longer.
- Paint conservation. A primer coat sets up a barrier against paint absorption through the wood, so you’re less likely to have to apply second and third coats.
To apply the primer, use a foam brush and roller for highest quality results.
It’s also a good idea to buy a shellac or oil primer instead of a water-based product, since oil primers create a better seal against the wood.
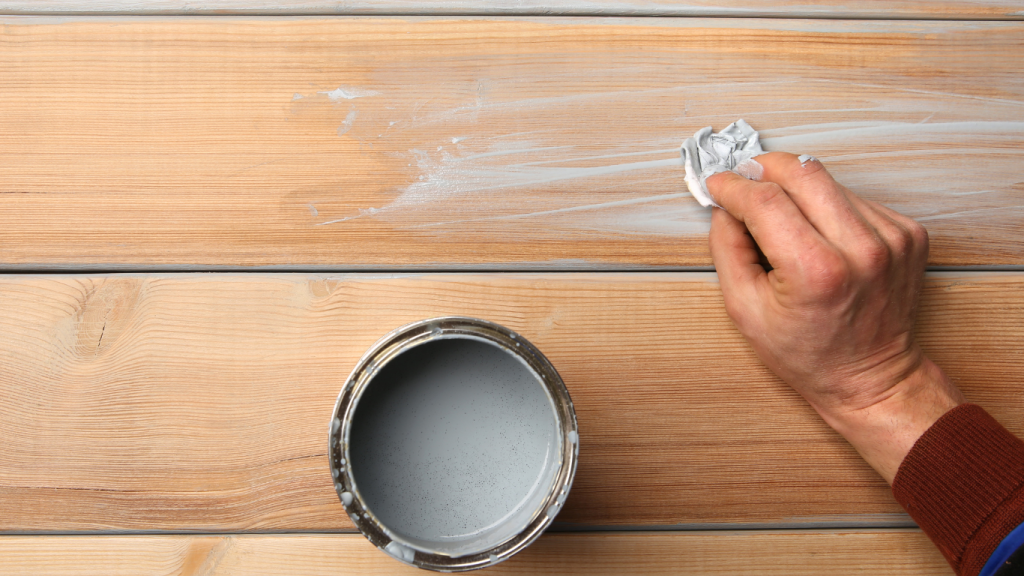
Step #5: Wipe the Surface
After you’ve given the primer plenty of time to dry, you can take a tack cloth and start wiping down the surface.
For a solid set of woodworking tack cloths, I’d suggest the Stead & Fast tack cloth set. The set of 6 cloths provides upsides like an affordable price tag, a tacky texture that helps gather dust and dirt, and a large size for wide area coverage.
Step #6: Painting
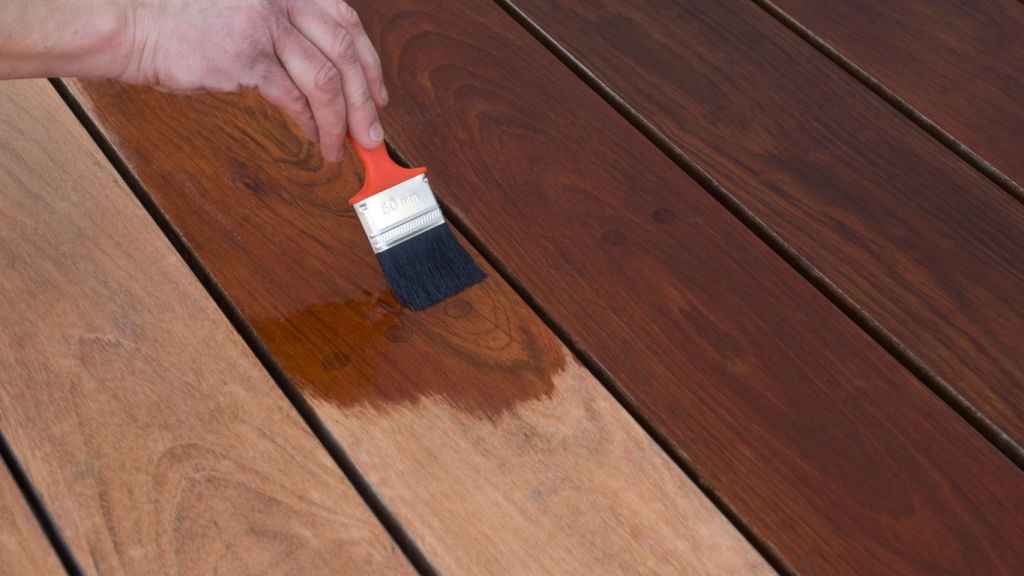
At last, we’ve reached our headline event: Adding the coat of paint!
If you’re wondering what type of paint to use over stained wood, there are two main choices:
- Latex paint. As an odorless paint, latex options are best when you’re painting over interior furniture.
- Oil paint. Due to their protective ingredients and long lifespan, oil paints are the ideal pick for painting outdoor projects like decks.
So, how can you paint over stain surfaces effectively?
Your main ally is going to be your foam roller, which you’ll use to carefully apply each coat of paint to the surface.
Usually, you want to roll at least 3 coats, but the number of coats depends on factors like type of paint, wood, and surface quality.
Make sure that you’ve given the paint several hours to dry before moving on to the next step!
Step #7: Add a Finish
Lastly, we can add our protective finish.
A wood finish isn’t always strictly necessary, but it’s normally a good idea. The extra coat adds some additional protection to the wood, increasing its chances of lasting longer and maintaining a high quality well into the future.
Methods for applying the finish differ based on manufacturer and product type, but, most often, you’ll add the finish with a cloth or spray can.
Fortunately, the product label typically has clear instructions for how to use the finish, so be sure to read the label carefully.
Conclusion
Enjoy reading this guide? Let me know in the comments if you still have any questions or would have liked me to explain something differently!
As a seasoned woodworker, I’m all-too-familiar with the struggles of painting over stained wood, so I sincerely hope my explanation can be of some use and I invite you to share my post with other woodworking enthusiasts!
*This post may contain affiliate links. Please see my disclosure to learn more.